![]()
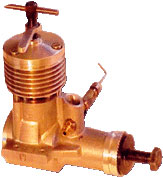
The Sharma .15 diesel is a great all around D-Bat engine,(Vintage diesel combat). I have had lots of fast flights with few inconsistent runs. Having said that, it's not exactly a turnkey operation. Here are things that I keep in mind when setting up a Sharma for vintage diesel combat.
Which Sharma to get? There are two versions of the .15 diesel. One version is imported by Mel Lyne and is made to his modifications. The case is from Sharmas .19 RC and will allow the removable needle valve in a tube as the PAW does. This is an advantage, other than that they run the same as the factory supplied engine. Mel takes pride in the engines he distributes so it's a good bet to buy his whenever possible. Mel, however is not importing them for a while so Carlson Engine imports is an option.
Ed Carlson is a great supplier and willing to talk to you and help with your decision.
The Sharma .15 is basically a copy of the PAW but has more consistent machine work, allowing for a better product. I'm not against the PAW, in fact my fastest engine is one. It required a tremendous amount of rework however since it would barely run 10,000 RPM when I got it. There, have I been P.C. enough now? By my introducing the Sharma to Northwest DBat, ( a Mark Hansen suggestion) the playing field is now mostly level and speeds are within a click or two of each other. The engine can run much faster but will run fine as is with some care. This is what I do to my engines.
When I get a new un run Sharma, I disassemble it and check the fit. To do this you will need to clean the oil off all parts, and remove the cylinder from the finned cooling housing. I use either a propane torch (carefully) or an oven set at 350 to expand the parts allowing for removal of the cylinder. Be sure you note where the ports ate in relation to the crank case so you can reassemble it correctly. I put an X using an X-acto on the front outside of the cylinder and point it to the front when I reassemble. Put a corresponding mark on the finned cooling housing since it orients the entire assembly with the head bolts.
Remove the contra piston carefully by slightly heating the liner and tapping it out from the bottom of the liner towards the top of the liner. I use a _" wooden dowel for this. Be sure to note the combustion chamber so it is not reassembled upside down. With the parts completely clean of oil, check the piston in the liner fit. There should be no tight spots below the exhaust port and it should be smooth until it gets tight toward the top. This is a "feel", if you are unsure then don't worry about the top end fit, you could do some damage and not know it. If there are tight spots, lap them out with a light polishing compound or better yet, a fine aluminum oxide. Below the bottom of the port, I invert the piston and lap it only on the lower skirt of the piston and do not engage any part of the last 1/2" from the top. Look for shiny spots on the piston as an indicator of a bind point, work on that spot only as it represents a bind. You can use 600 emery and crocus cloth to do this.
Next check the crank shaft to the case. Lap out any binds but not the last front _" of the shaft so you get a good pressure seal there. This as well as the piston work is where "more is less" be very careful to not over do it. Reassemble the engine being careful to slightly heat the liner and carefully tap the contra piston into the top of the liner.
The most important part of this article. I'll copy a portion of expert Adrian Duncan's article on this. Remember that with the old iron and steel materials, you are hardening the metal which will make it grow the piston. Once this is done, you must run it for a fairly long period of time to re lap the piston to the liner. It has grown and will be tight. No way around it guys, just do it. Once broken in, speed will increase and it should start easier.
 To achieve this, the following procedure works best:
I have seen many other approaches to breaking-in, including a number of "instant" break-in procedures. All of these in my experience have resulted in excessive premature piston wear during the break-in process, and motors broken in "on the fly" in this way neither perform nor last anywhere near as well as those which receive the treatment recommended above. I hope it will be clear from the above explanation that time, and time alone, can achieve a proper break-in with a ferrous piston/cylinder combination due to the unique properties of these two metals in combination. You've paid for it - you might as well get the full performance potential for which you've paid! My 1961 Frog 349 is still going strong on the original bore, runs like smoke and feels like new with well over 100 hours of running on it - the original piston fit is still totally leak-free. It's all down to the break-in!
Break it in right and you'll have an engine that will stick with you through thick and thin!!
Well, there you have it, the long and short of how to make your new engine perform.
After break in, I usually disassemble the Sharma and re inspect as I did when new. Look for shiny spots that indicate a binding area and correct as you did before. You can work on shiny spots on the piston, below the wrist pin, more aggressively than the portion above it. Look carefully at the crankshaft, note the intake area to see if it has grown or if there is any binding there. I have had two engines that needed relief around this area. Using a high intensity lamp and a magnifier, you can drag the edge of a steel over the port to detect high spots that may have formed.
Carbon will build up on the combustion side of the contra piston and the top of the piston. This will rob power. I disassemble the engine and remove it with fine sandpaper on a flat surface, moving the piston in a figure 8 motion. Any method of removing it that does not damage the engine is acceptable. I generally don't run them enough to need this more than once per flying season.
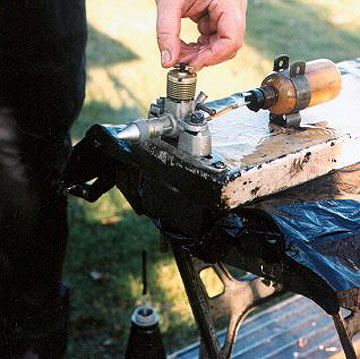
Use the best fuel you can afford. The vintage engines like lubricant and I don't recommend synthetic oil. If you have a blended synthetic and castor, bring the total oil content up to 25%-29% by adding castor oil. Carlson Engines carries fuel for $28.00 per gallon. The manufacturer (FHS) will not tell him what oil is in it, but the content is 22% oil. If you buy this, be sure to add 4 -5oz of good castor oil to it.
When diesel fuel sits over long periods of time (3 months or more) some of the either content will migrate out of the container. Containers that are used and opened to the air, more will boil out. When this happens, the diesels are hard to start, and generally the typical modeler will increase compression in an attempt to start it. This is very hard on the engine, the either is there only to help in starting. The original either content is about 30%. A practical idea is to buy either starting fluid at the auto parts store and infuse new either back into your fuel. You will have to experiment with how much to add, in a quart container I start by submerging the plastic tube from the spray can into the fuel, hold down and count to four. Try the fuel and see how it responds.
We have not removed any significant material from the engine, only burrs and binding spots, a well fit engine will work great in Vintage Diesel Combat. Once all set up, try not to disassemble it without good reason. The engine should run well on a 7x6 to 8x6 prop, start fairly easy when broken in correctly.
-- Kenny-b
This page was upated April 7, 2010